Widescreen Gaming Forum

[-noun] Web community dedicated to ensuring PC games run properly on your tablet, netbook, personal computer, HDTV and multi-monitor gaming rig.
It is currently 13 Sep 2024, 05:10

All times are UTC [ DST ]


Post new topic Reply to topic  [ 11 posts ]  Go to page 1, 2  Next
Author Message
PostPosted: 02 Feb 2009, 01:01 
Offline
Editors
Editors
User avatar

Joined: 31 Jul 2006, 14:58
Posts: 1497
Sometimes I tend to be sporadic about things, and my new thing of the day is Mame.

I have gotten into mame for a short while a few times and then left it alone for a long time.

I guess maybe because I finally got my wiimote classic controller I realized how great it is to have the right controller for the job. So now with mame I really want a joystick like the arcades.

I spent the better part of the day looking for some, with google I found only two really.

The Saulabi 4K - http://www.play-asia.com/paOS-13-71-1i-49-en-70-22b8.html

@ $50 its not cheap per say but it looks solid and I like its key layout. I probably would have got it if when I went to check out I did not see the $20 S&H charge.

So from there I ventured out and ran into x-arcade and they have a nice rep for good stuff. http://www.xgaming.com/products.shtml

I would have wanted there solo, @ $100 now thats hard to take down... and not even available, but reviews showed consistently that its a great quality, and with lifetime warranty and with the adapters it works for many systems.

What I ended up doing was googling for a direct comparison between the two, and found a forum where a guy is like... Well the Saulabi is good but you need to change out the stick for a Happ, and the x-arcade is overpriced. So why not just build your own..

So the green mod light comes on and I was like "WHY NOT??" so its decided.

Im open for hints, tips, recommendations, stories, links, pointers, anything that relates to this. However I spent all day researching what you can get, what i need, prices, how to do it, and this was my results.

I decided for now I need to be cheap and not drop a lot of money on something I do not know how often I will use or how it will turn out. So no buying super expensive premium items.

I found out that almost all those premades and the vast majority of all arcade stuff is digital, just on or off switches in the joysticks, its not analog.

So I had to debate if I want analog or not. Since its cheaper to do digital and this is mostly for mame, I went digital. Analog would be great for a few games and for PC game use, but I would normally use keyboard/mouse for that or my 360/wii controllers.

Now came the controller, I found 2 devices.

This one that is absolutely ingenious and I have to get it one day.

http://www.u-hid.com/

50 connections, small, and as a HID unit its all plug and play. Instantly access to map things as a controller, keyboard, mouse, ect ect. @ $85 its too much though.

They have a nano version for $35 that severely tempted me, but with only 8 connections I would be left very limited.

With a analog joystick that would work. 1 pin for Y axis, 1 for X axis, and the other 6 for a button each. I could pair it with the shift function to double the button count (for like coin & start buttons)

But since I could not find any analog joysticks at all really and previously decided on digital this wont work.

So the other product I found is the I-PAC and this store: http://www.ultimarc.com/ipac1.html

Its a very easy to use board that will convert switches into keyboard commands. Its not incredibly expensive ether. It just so happened that site has some kind of Value version of it that does not have on board memory and its a few $ cheaper and free ship. So $35 shipped and its ordered. has enough connections for 2 peoples controls too.

That site has some ok items, but via research I found that Happ was probably the best stuff to get, and to my surprise not too expensive ether.

So im plugging into that controller a Happ Competition Joystick - http://www.happcontrols.com/joysticks/competition_joy.htm

Seems to be through and through rated the best you can get for the money and great for fighting games with its square actuator. Medium throw and medium spring make it just right. (getting the black one)

For buttons same site, same brand. The stuff they use most these days is also the competition line buttons so gonna get 2 red, 2 green, 2 yellow - http://www.happcontrols.com/pushbuttons/5896xxl.htm

I was going to get a start & coin button but since I am going to be at the computer I can just use the keyboard for that to save a bit of money and work. The real reason for it though is what your about to read.

The final thing I really am missing that I would need is the host body. I was just going to make it out of wood, but with my very cramped room, and no real desk I have nowhere to sit it to use it, and thats more money too.

So I just noticed like an hour ago that my desk... is about perfect for this. It is one of those desks that have the self/cover that lifts up to slide the keyboard in and out, and when its down it acts as a place to sit papers and stuff.

If I tuck the keyboard in though its tilted just a tad sharp its a perfect already supplied and fixed base to install those arcade controls :P It wont go anywhere and true to the nature of modding this, it will be quite cool to not only build a joystick but mod my desk at the same time.

So thats whats up, that free shipping for the control card can take like 21 days max, and the Happ site is turning down my debit card for some reason (there server must be down) so it may be awhile for me to get the stuff but I will have a full before & after log of this little project.


I'll share the one other thing I gave incredibly strong consideration too, and if I ever build another, or or do a stand alone unit this is what I will get I think: http://www.ultimarc.com/ultrastik_info.html

The UltraStik 360 - its just pure bad assness. First of all its analog, and its not very expensive, half the price of the Happ analog sticks.

Whats even more crazy about it is that it is fully programmable with maps of functions so you can tell it where within its grid of movement what it does, effectively making it a 2 way, 4 way, 8way, ect joystick. Some games hate diagonals so this is a solution.

In addition it has input/output modes. Its input mode will accept up to 8 switches and send them out as control pad buttons to the computer and its a plug and play HID device. Its pretty much like the U-HID and a high quality joystick together in one package for a really good price.

The main reason I turned this option down is again trying to be froogle here and not spend much and upon reading up on it I found that stock it has a light spring, and a large throw so to make it feel and work good like the comp stick I got I would have to buy the restrictor plate for it $8, the harder spring, $3 then to hook the buttons to it unless I want hell with soldering the wire harness is $8

So it goes 60 + 8 + 3 +8 = $79 and while I think its most definitely worth it I passed considering my needs.

But this thing is awesome for sure, I recommend you read this review of it to see what kind of cool stuff it can do. - http://www.retroblast.com/20060903208/Hardware/Ultimarc-UltraStik-360-Review.php

So hope I have some of you interested, its been ahile since I have built something or done a mod. After the fact my computer desk is going to be one of a kind!

_________________
ViciousXUSMC on the Web - YouTube :: FaceBook :: Website


Top
 Profile  


PostPosted: 02 Feb 2009, 01:59 
Offline
Insiders
Insiders

Joined: 07 Nov 2005, 04:16
Posts: 3010
I built a MAME control panel for myself. It wasn't cheap by any means - in all it cost me about $300, but it's pure badass, and covers 99% of the bases.

I found that Happ Supers work the best as general purpose joysticks. Competitions and 360's are better for fighting games, but Supers work nicely for just about everything. Most of the parts in the controller are made by Happ.

My panel has dual SF2-style layouts, with a single Happ Super and six microswitch pushbuttons on each side of the panel. In between them is a 3" trackball, also from Happ. Above the trackball is an authentic Ms. Pacman / Galaga 4-way joystick, which is hands down the best 4-way joystick ever created. The diamond shaped actuator ensures that you never get the thing caught on a corner in a game such as Pacman where you only want to move the stick in four directions. The top part also has a spinner - a Slikstick Tornado, which can spin for almost 3 minutes. And it has the start/coin buttons and some administrative buttons.

The encoder is a miniPac, which is basically a miniature IPac merged with an OptiPac for trackball and spinner.


Top
 Profile  
 
PostPosted: 02 Feb 2009, 06:25 
Offline
Editors
Editors
User avatar

Joined: 31 Jul 2006, 14:58
Posts: 1497
You have to share some pics with me.

I know most of those parts from reading earlier, supers do not have a good rep though.

I think I would get that UltraStik 360 for my all rounder when the time comes.

Games I know I want to play.

Street Figher Alpha 3
Killer Instinct 2
Ultimate Mortal Kombat 3
Dodonpachi
Metal Slug series.

Id have to get a strong enough pc to run Marvel vs Capcom 2 running, and my dreamcast is the only system I know of that I like it on.


It should work out with the stick I chose.

My layout will be two rows of 3 buttons like Street fighter uses. Seems like it would work the best for the largest amount of games.

I started thinking later in life this may turn into a bigger project, like an arcade cabinet for 2 players. But I am thinking outside of the box.

Instead of trying to simulate a old machine perfectly and having the monitor, I am thinking of building a Mame "Podium" that will be like the bottom part of a machine and instead of a monitor it will have a projector built into it.

If I go that far I would maybe want hot swapable key layouts, the standard 3x2 but I would also like a Mortal Kombat button layout.

I cant think of any games I would play that use the spinner or track ball, though the ball could come in handy to navigate windows, but I was going to try that version of Mame that is made for cabinets that boots into mame upon power on and can also turn off the computer and its all done via controller. If anything I would get something like this and have it on a slide out drawer or if the center was big enough for it to not get in the way: LINK

For the brain I would most definitely use the U-HID as it can do everything the MiniPac can and much more. I would also probably try to have an actual quarter slot on there (maybe make money :P)

I love the shooters too so something like the TopGun II and a pedal would be a future add on. I am thinking that I can wire a pedal in parellel onto an A-PAC as its just open/close switches. So while playing a shooter I would just bind that key to be duck and you would be able to use the pedal or a button.

The TopGun of course works similar to how the wiimote works with IR sensor bars so thats how it works with LCDs & Projectors. Id just have a little cubby to hold it inside the "podium" and some stick tac to mount it to a wall for play.

_________________
ViciousXUSMC on the Web - YouTube :: FaceBook :: Website


Top
 Profile  
 
PostPosted: 02 Feb 2009, 08:35 
Offline
Editors
Editors
User avatar

Joined: 31 Jul 2006, 14:58
Posts: 1497
Ordered my parts.

happ.com wont let me check out it gives me an error for authing my debit/credit card.

But no loss to me, I googled the product to see who else has it and found it cheaper on ebay, so I bumped up the order for the sake of shipping cost.

Instead of 1 Comp stick I got 2 from this guy:

http://cgi.ebay.com/ws/eBayISAPI.dll?ViewItem&item=260348229391

Reason, like $1.60 s&h for the 2nd one and so maybe I will build a 2 player setup now, my brain already supports 2 people so why not??

For the buttons, stepped it up too since its flat rate shipping after 10.
I got 14 from this guy: http://cgi.ebay.com/ws/eBayISAPI.dll?ViewItem&ssPageName=STRK:MEWNX:IT&item=290289594117

2x Red
2x Green
2x Yelow
2x Blue
2x Purple
2x Orange
1x Player 1
1x Player 2

Total 14 buttons.

So I can have the street fighter setup with two rows of 3 and a start button for each player.

My damages came out under $50 for the buttons & sticks.

The brain was $35 shipped as previously stated.

I'll still have to add the misc cost of some wire crimps and wire, but that wont be much. I already have a paddle bit big enough for the buttons I think, if not they are cheap.

The joystick holes however pose a problem, they are big and would require a router or a hole saw. I do not have ether and they are expensive. With luck my step dad may have the right size hole saw that I can barrow.

Oh and I will need a USB cord to hook the keyboard brain to the computer.

If it was not for the fact that I insisted on having the convex competiton buttons, this would have been an ideal solution:

http://cgi.ebay.com/HAPP-JOYSTICKS-14-BUTTONS-JAMMA-ARCADE-MAME-FREE-WRENCH_W0QQitemZ220349956049QQcmdZViewItemQQptZLH_DefaultDomain_0?hash=item220349956049&_trksid=p3286.c0.m14&_trkparms=72%3A1205|66%3A2|65%3A12|39%3A1|240%3A1318|301%3A1|293%3A1|294%3A50

Everything in one cheap kit from a reputable seller. Even offers the option of Comp or Super for the sticks.

They use the concave buttons though, for some reason I have a feeling the convex ones are nicer.

This is going to be totally cool when its done. Now I just have to get my wife to play with me, and for once I am talking about video games.

Edit: actually its a really good thing that I got stuff for 2 people, if anybody is going to join me its my oldest son. He loves to watch me play games but would like even more to play. He is 3 so I do not trust him with controllers much and they are harder to operate, but this... this is perfect.

Its going to be a great father son bonding tool :P

_________________
ViciousXUSMC on the Web - YouTube :: FaceBook :: Website


Top
 Profile  
 
PostPosted: 11 Feb 2009, 08:15 
Offline
Editors
Editors
User avatar

Joined: 31 Jul 2006, 14:58
Posts: 1497
Update: I dont want to scare everybody away with a huge post that nobody will read but I have ordered many more parts and the project has changed from a 1 player super budget setup to a 2 player full modular setup.

So I have the joysticks & buttons and did the drilling today and got the buttons in. Im still deciding if I want to route the joystick mounts into the panel or not. Doing so will make them a bit higher but make it harder to mount and its more work.

I need help with finding the last few parts I need.

If anybody is familar with digikey.com they should have what I need.

I need the part# for the DB25 connectors that are solderable and can mount to the outside of an enclosure.

I need project boxes to host my hacked dreamcast controllers & my I-PAC, and I need cheap terminal strips (terminal blocks) to mount and organize the wires.

I think digikey has all of that but I am not sure. I have had to get parts from so many places because nobody has it all.

A quick list off the top of my head.

Radio Shack
1.) 22ga Hook Up Wire to wire it all
2.) 1x DB25 female connector (I need one more but they only had 1)

Lowes
1.) Crimp Tool
2.) Assorted screws and insert nuts to mount the joystcks
3.) Flush Trim Router Bit incase I decide to put a plexi cover on the control panel it will be a good way to cut the holes and shape the plexi.
4.) a 1 1/8" Forester Drill Bit for the Joystick & button holes.

Monoprice.com
1.) 4 port DB25 swtich, to switch between my different modular adapters, plans are to use the I-PAC for the PC, and 2 hacked Dreamcast controllers for the Dreamcast and leave me with 2 spots open for future expansions
2.) 3x DB25 cables to interface from the CP to the Swtich and from the switch to the encoders.
3.) 2x DB25 Gender adapters because they did not have the cable type I needed so had to get Male/Female cables instead of Male/Male.

LizardLick.com
1.) 50 .187" Female Quick Connects to wire the joysticks and buttons with, RadioShack had them but only in combo kits with 6 each so I would have to pay extra for stuff I do not need. Lowes did not have them and the other online sites wanted way too much for S&H. I will do business here again for my next build as they carry all the Sanwa parts.

Ultimarc.com
1.) I-Pac Value - My keyboard encoder for PC

Ebay.com
1.) From TornadoTerrysDot my 2x Happ Competiton Joysticks, and 14 Happ Competition Buttons. This is when I diecded to go from 1 player to 2 players because the item cost was low but S&H higher, but additional items had lower S&H, since the I-PAC already has support for 2 players, it just made sense to spend a bit more and upgrade to 2 players so my kids can play too.
2.) From trueslections a roll of 18"x6ft black marble contact paper - figured I would need an easy way to cver the joystick holes if I ended up having to top mount them, much cheaper & easier than plexi. I ended up going bottom mount but used it anyways for looks. I really like it.
3.) From Classic-Games-Source 2x Dreamcast controller extention cords. I got them incace I need to cut them to wire into my adapter, or just so the DC can be far away from my adapter for convience.
4.) From The Lost Chapters - 4x Dreamcast controllers, to be hacked into encoders to use the arcade controls on the Dreamcast.

HarborFreight.com
1.) Small laminate router, a low power cheapo router that should do all the work I need for this CP without investing in an expensive router
2.) A set of 3 router bits, no guides or bearings just normal cutting bits.

IntegrityInstruments.com
1.) A DB25 Female connector already attached to a PDB with a Terminal Block. More expensive than the DIY of sldering a DB25 connector to a project box and buying a termainl block but it just made sense to use it since it will make it much neater & easier and can be mounted under the CP. I sort of want one of these for the encoder boxes too but it does not make as much sense there and they are expensive.

Xoxide.com
1.) A USB A-B Cable to hook the I-PAC to the PC

I THINK thats everything but I still need the DB25 connectors, project boxes, and terminal blocks at the very minimum, and wish me luck with all the soldering and the dreamcast pad hacks.

Its going to be a strech of luck for it all to work out perfect and to find the rest of the parts I need. So looking for help locating them.

Here are some pictures so far.

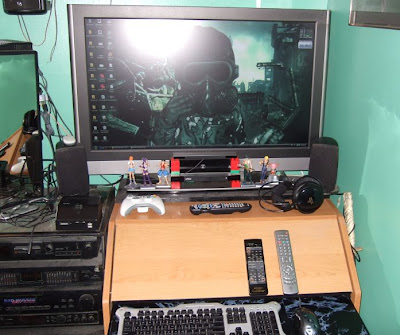
My Desk that was destined to become an arcade control panel:


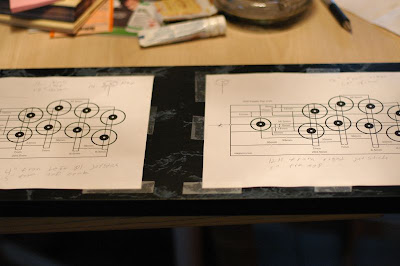
The Template and layout I decided to go with for my controls (Japanese Style, with the joystick a bit further out)


Both Templates in place, a good view of the black marble contact paper I got off ebay for $5


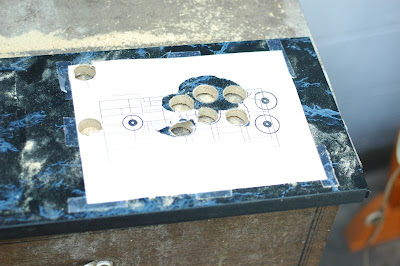
I was worried that I made a mistake putting the vinyl paper on before cutting and that it would tear when I drilled the holes but it came out ok


After blowing some of the dust away and taking the template off:


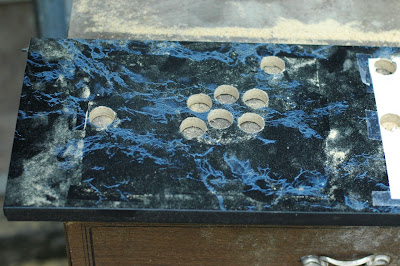
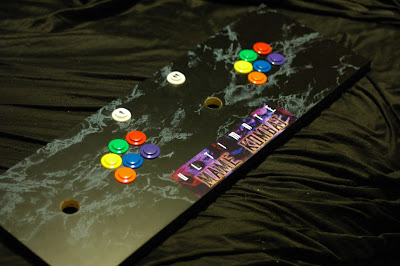
Being impatient and putting the buttons in when I probably should not have done so yet (esp if I decide to route the joystick in) looks like the holes came out ok, I was affraid they would be crooked since I had no guide, seems like even though I drilled pilot holes first all my holes went about 1 or 2 mm to the left of the template. Also a little Mortal Kombat Marquee I made that I may put on the CP:
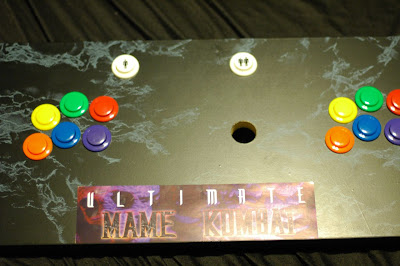

Another Angle:


I got very lucky my neighbor had a power drill and let me barrow it, I had a fully charged battery on a high end Makita cordless and just after 1 hole it was about dead. I was surprised to see that new forester bit I bought did not drill through nearly as fast as I thought it would, even with a high speed power drill.

I am pretty happy with how it came out, but the project is still FAR from done, all the wire parts and the dreaded soldering/hacking part has yet to be done.

Wish me & the project luck and stay tuned for updates.

_________________
ViciousXUSMC on the Web - YouTube :: FaceBook :: Website


Top
 Profile  
 
PostPosted: 11 Feb 2009, 21:44 
Offline
Editors
Editors
User avatar

Joined: 10 Jun 2005, 21:24
Posts: 1371
Update: I dont want to scare everybody away with a huge post that nobody will read but I have ordered many more parts and the project has changed from a 1 player super budget setup to a 2 player full modular setup.


It looks cool and I have been following this from the beginning. :)

Please update when you have progress!


Top
 Profile  
 
PostPosted: 13 Feb 2009, 10:10 
Offline
Editors
Editors
User avatar

Joined: 31 Jul 2006, 14:58
Posts: 1497
Update:

I went to the budget tool store and got the stuff to install the joysticks.

This was the first step that I was not really happy with the outcome. The plan was just to mount a joystick to see if I liked the depth or if I felt it needed to be routed out for a higher shaft.

So I as usual had to do things one step better than just basic. In this case that meant buying brass inserts to screw into the board because mdf does not hold up very well after a screw is taken out a few times so just incase I ended up having to take these off I wanted a good permanent hold.

So first thing I did was take a square and mark lines through the hole as centered as possible so that when I put the joystick body over the hole I knew where center was.

Then I penciled the holes so I would know where to drill.

I used a small bit first as a pilot hole and then a bigger bit. I took the insert and held it up to the bit to see how much depth it has and then put electric tape on the bit to mark my max depth point.

These inserts do not tell you what hole size you need so I just had to eye it. You would think you want the hole smaller so that the threads sink in good but after doing it I think thats not the case as even a slightly smaller hole resulted in the inserts not wanting to go in and screwing in crooked.

So the very first one when I went to screw it in I guess did not get drilled deep enough and broke the other side out. Its minor and you cant really see it due to the vinyl paper covering it but it still annoys me.

The other 3 on the first stick went ok but just a bit crooked.

Stick 2 the first 3 went great as I knew I had to make the holes a bit bigger and drill a bit deeper, except the last one. It refused to screw in straight and by the time I got it to go straight as I was tightening it, it striped out.

So I had to use a wood screw on the last one (the joystick body has 2 holes for each side a life saver)

So my lesson here is that keeping it simple is not a bad idea and just using wood screws would have been cheaper, easier, and probably resulted in a more flush and perfect mount.

Still hands on with the joysticks they feel fine unless I have any problems with them I see no reason to remount them.

Now its back to the waiting game for more of the parts to come in. I need at minimum for the next step the quick connects and the female DB25 connector to wire the control panel up.

Then after that I need the DB25 cables, the I-PAC, and some project box to wire the PC adapter up to the control panel.

The dreamcast adapter I can take my time on. I still have to find all the dreamcast stuff to make sure its all in working order.

Pics:

Drawn center lines, and some of the inserts in place


Player 1


Player 2


Full Control Panel

_________________
ViciousXUSMC on the Web - YouTube :: FaceBook :: Website


Top
 Profile  
 
PostPosted: 13 Feb 2009, 10:10 
Offline
Editors
Editors
User avatar

Joined: 31 Jul 2006, 14:58
Posts: 1497
Here is what the wiring plans are:


I may use that one unused pin for a coin input button that will be between the P1 & P2 start buttons, but it would cost a lot to order just one arcade button, so may have to settle for a little radio shack button.

_________________
ViciousXUSMC on the Web - YouTube :: FaceBook :: Website


Top
 Profile  
 
PostPosted: 19 Feb 2009, 12:30 
Offline
Editors
Editors
User avatar

Joined: 31 Jul 2006, 14:58
Posts: 1497
The I-PAC VE came in. Being impatient I gave myself a good excuse to install it on the CP and start playing rather than wait and do it right the first time and wire up the DB25 instead.

The reason is since this for now is only going to be a 2 way system modular for PC & Dreamcast there is no reason to go through the trouble of setting it that way until I have my dreamcast up and running and have hacked the controllers and have that working. At that time I can unhook the I-PAC and wire in the DB25 connectors and send the CP signals to a switch and then put the I-PAC VE in a adapter box and do the same for the hacked DC controllers.

It worked out well, though the first time I mounted and wired the I-PAC I had it a bit too high up not accounting for the fact the USB cord is going to stick out, the drawer still fit on and moved but it was putting some leverage on the PCB and I did not feel comfortable with it. Great luck on my side I was able to just take out a few wires and it fit between the joystick & buttons and them mount it back down, and all the wires were long enough to make it.

Update: Even greater luck on my side my DB25 terminal board I plan to use on the CP is here and its nice and small it looks like it will swap out with the I-PAC easy, if it was too large I may have had to re-run many of those wires and that means buy more quick connects too as I used every single one of the ones I bought.


Photo Time:

My Final Plans for Wiring:
Waiting on parts to arrive I planed out my pin & wire connections.


I found that I will need separate ground for P1 & P2 to hook up to the hacked controllers. Lucky the DB25 connection has enough room and I infact still have 1 wire left to add one more button if I wanted. I was going to make it a coin button but for now the Shift function of the I-PAC is working very well and I do not see the need. On a full blown cabinet simulation I would get one of those light up coin buttons and use it for that.

Operation Groundhog Day: Day after I had my wire plans done Lizard Lick got my female quick connects to me in the mail. So even though I had nothing to wire the ground too, I had to do something to keep sane and wired up the ground chain for both players and just left a long wire on the last connection so it could go where ever it needed too.

Note the mistake I made near the P1 buttons (the female connector not connected to anything) I found it easier to make several chains at once before attaching it on the board so I could work in the air instead of being tethered by a wire connected to the board. Somehow I made it too short but then I realized its a good thing... If I want to use that last button wire I have I can now really easy just plug a male connector in there and it will be a part of the ground chain with no hassles. Infact I love the idea of it now and will do that in the future with other panels too.

P1 Side


P2 Side


Full wired panel 2 days after the quick connects came the I-PAC finally came in. I just could not wait for all the other parts and then do the modular thing, my curiosity got the best of me so I wired it all up:

P1 Side


P2 Side


So with it all wired up it was time to put my desk back together and see how it all worked out!

Desk in "arcade mode" with keyboard inside desk


Desk in "computer mode" with keyboard & mouse out


Another angle


Here is what it looks like if you lift it up all the way and let it lean against the desk it will hold itself up


Its been about a week now since I put it together and its been a BLAST!

I have visited Mame about 4 or 5 times in my life and each time within a week it was dull, boring, and got deleted. This time now with the controls its 30x more fun and very addicting. My 2 year old son asks me 500 times a day now "Daddy can we play a game?" "I wanna play game" I never hear the end of it :P

Just yesterday the switch & cables came in from monoprice, so I need to see if I can get all my dreamcast stuff together (need to find power cable & vga cable, I found the system and most of the games) and then go to radio shack and get one more DB25 connection to solder too and some project boxes and start hacking those, I will just test it by connecting the wires in the project box to ground and see if I can do this.

Once I get the dreamcast adapter working then I will remove the I-PAC and do the same. Put it in a project box and then wire it all back together and then I will have this awesome 2 system modular setup and the switch has 4 positions, so I still have room to add 2 more systems in the future. Stay tuned for that adapter box work, me + soldering = something interesting. I have 4 controllers to work with off ebay so I can mess up 1 or 2 and still make it lol...

_________________
ViciousXUSMC on the Web - YouTube :: FaceBook :: Website


Top
 Profile  
 
PostPosted: 19 Feb 2009, 13:20 
Offline
Insiders
Insiders
User avatar

Joined: 21 Mar 2006, 05:01
Posts: 1993
All you need now is a quarter slot. And a sticky floor.

...and quarters.

Looks pretty nifty. I assume those sticks are set up for 8-way control? Now you need one of those big, wacky roller ball things that used to come on some arcades. Or do they still? i haven't glanced at an arcade machine since i got my first >486 computer.


Top
 Profile  
 
Display posts from previous:  Sort by  
Post new topic Reply to topic  [ 11 posts ]  Go to page 1, 2  Next

All times are UTC [ DST ]


Who is online

Users browsing this forum: No registered users and 6 guests


You cannot post new topics in this forum
You cannot reply to topics in this forum
You cannot edit your posts in this forum
You cannot delete your posts in this forum
You cannot post attachments in this forum

Search for:
Jump to:  


Powered by phpBB® Forum Software © phpBB Group